const 发布的文章

“const”

tcpdump 官方说明文档
https://www.tcpdump.org/manpages/tcpdump.1.html
tcpdump 保存文件
tcpdump -i lo -w temp.pcap -C 10 -W 3
只显示除push和ack外的网络包

 tcpdump -i lo tcp port 31009 and 'tcp[tcpflags] & tcp-push==0' and 'tcp[tcpflags] & tcp-ack==0' -nnvvx

也可以使用

tcpdump -i lo tcp port 31009 and 'tcp[13] & 8 == 0' and 'tcp[13] & 16 == 0'

Show all URG packets:

tcpdump 'tcp[13] & 32 != 0'

Show all ACK packets:

tcpdump 'tcp[13] & 16 != 0'

Show all PSH packets:

tcpdump 'tcp[13] & 8 != 0'

Show all RST packets:

tcpdump 'tcp[13] & 4 != 0'

Show all SYN packets:

tcpdump 'tcp[13] & 2 != 0'

Show all FIN packets:

tcpdump 'tcp[13] & 1 != 0'

Show all SYN-ACK packets:

tcpdump 'tcp[13] = 18'

Show icmp echo request and reply

tcpdump -n icmp and 'icmp[0] != 8 and icmp[0] != 0'

Show all IP packets with a non-zero TOS field (one byte TOS field is at offset 1 in IP header):

tcpdump -v -n ip and ip[1]!=0

Show all IP packets with TTL less than some value (on byte TTL field is at offset 8 in IP header):

tcpdump -v ip and 'ip[8]<2'

Show TCP SYN packets:

tcpdump -n tcp and port 80 and 'tcp[tcpflags] & tcp-syn == tcp-syn'
tcpdump tcp and port 80 and 'tcp[tcpflags] == tcp-syn'
tcpdump -i <interface> "tcp[tcpflags] & (tcp-syn) != 0"

Show TCP ACK packets:

tcpdump -i <interface> "tcp[tcpflags] & (tcp-ack) != 0"

Show TCP SYN/ACK packets (typically, responses from servers):

tcpdump -n tcp and 'tcp[tcpflags] & (tcp-syn|tcp-ack) == (tcp-syn|tcp-ack)'
tcpdump -n tcp and 'tcp[tcpflags] & tcp-syn == tcp-syn' and 'tcp[tcpflags] & tcp-ack == tcp-ack'
tcpdump -i <interface> "tcp[tcpflags] & (tcp-syn|tcp-ack) != 0"

Show TCP FIN packets:

tcpdump -i <interface> "tcp[tcpflags] & (tcp-fin) != 0"

Show ARP Packets with MAC address

tcpdump -vv -e -nn ether proto 0x0806

Show packets of a specified length (IP packet length (16 bits) is located at offset 2 in IP header):

tcpdump -l icmp and '(ip[2:2]>50)' -w - |tcpdump -r - -v ip and '(ip[2:2]<60)'

tcpdump常用命令补充

Basic communication (very verbose) // see a good amount of traffic, with verbosity and no name help

tcpdump -nnvvS

A deeper look at the traffic // adds -X for payload but doesn’t grab any more of the packet

tcpdump -nnvvXS

Heavy packet viewing // the final “s” increases the snaplength, grabbing the whole packet

tcpdump -nnvvXSs 1514

host // look for traffic based on IP address (also works with hostname if you’re not using -n)

tcpdump host 1.2.3.4

src, dst // find traffic from only a source or destination (eliminates one side of a host conversation)

tcpdump src 2.3.4.5
tcpdump dst 3.4.5.6

net // capture an entire network using CIDR notation

tcpdump net 1.2.3.0/24

proto // works for tcp, udp, and icmp. Note that you don’t have to type proto

tcpdump icmp

port // see only traffic to or from a certain port

tcpdump port 3389

src, dst port // filter based on the source or destination port

tcpdump src port 1025 
tcpdump dst port 389

src/dst, port, protocol // combine all three

tcpdump src port 1025 and tcp
tcpdump udp and src port 53

You also have the option to filter by a range of ports instead of declaring them individually, and to only see packets that are above or below a certain size.

Port Ranges // see traffic to any port in a range

tcpdump port range 21–23

Packet Size Filter // only see packets below or above a certain size (in bytes)

tcpdump less 32
tcpdump greater 128

[ You can use the symbols for less than, greater than, and less than or equal / greater than or equal signs as well. ]

// filtering for size using symbols

tcpdump > 32
tcpdump <= 128

[ Note: Only the PSH, RST, SYN, and FIN flags are displayed in tcpdump‘s flag field output. URGs and ACKs are displayed, but they are shown elsewhere in the output rather than in the flags field ]

Keep in mind the reasons these filters work. The filters above find these various packets because tcp[13] looks at offset 13 in the TCP header, the number represents the location within the byte, and the !=0 means that the flag in question is set to 1, i.e. it’s on.

Show all URG packets:

tcpdump ‘tcp[13] & 32 != 0’

Show all ACK packets:

tcpdump ‘tcp[13] & 16 != 0’

Show all PSH packets:

tcpdump ‘tcp[13] & 8 != 0’

Show all RST packets:

tcpdump ‘tcp[13] & 4 != 0’

Show all SYN packets:

tcpdump ‘tcp[13] & 2 != 0’

Show all FIN packets:

tcpdump ‘tcp[13] & 1 != 0’

Show all SYN-ACK packets:

tcpdump ‘tcp[13] = 18’

Show icmp echo request and reply

tcpdump -n icmp and ‘icmp[0] != 8 and icmp[0] != 0’

Show all IP packets with a non-zero TOS field (one byte TOS field is at offset 1 in IP header):

tcpdump -v -n ip and ip[1]!=0

Show all IP packets with TTL less than some value (on byte TTL field is at offset 8 in IP header):

tcpdump -v ip and ‘ip[8]<2’

Show TCP SYN packets:

tcpdump -n tcp and port 80 and ‘tcp[tcpflags] & tcp-syn == tcp-syn’
tcpdump tcp and port 80 and ‘tcp[tcpflags] == tcp-syn’
tcpdump -i <interface> “tcp[tcpflags] & (tcp-syn) != 0”

Show TCP ACK packets:

tcpdump -i <interface> “tcp[tcpflags] & (tcp-ack) != 0”

Show TCP SYN/ACK packets (typically, responses from servers):

tcpdump -n tcp and ‘tcp[tcpflags] & (tcp-syn|tcp-ack) == (tcp-syn|tcp-ack)’
tcpdump -n tcp and ‘tcp[tcpflags] & tcp-syn == tcp-syn’ and ‘tcp[tcpflags] & tcp-ack == tcp-ack’
tcpdump -i <interface> “tcp[tcpflags] & (tcp-syn|tcp-ack) != 0”

Show TCP FIN packets:

tcpdump -i <interface> “tcp[tcpflags] & (tcp-fin) != 0”

Show ARP Packets with MAC address

tcpdump -vv -e -nn ether proto 0x0806

Show packets of a specified length (IP packet length (16 bits) is located at offset 2 in IP header):

tcpdump -l icmp and ‘(ip[2:2]>50)’ -w — |tcpdump -r — -v ip and ‘(ip[2:2]<60)’
// 获得计算机名
AnsiString GetComputerName()
{

      char   name[MAX_COMPUTERNAME_LENGTH   +   1];    
      DWORD   size   =   MAX_COMPUTERNAME_LENGTH   +   1;    
      if(GetComputerName(name,&size))    
              return   AnsiString(name);    
      return   "";    

}

// 获得当前用户名
AnsiString GetUserName()
{

      char   username[MAX_COMPUTERNAME_LENGTH   +   1];    
      DWORD   size   =   MAX_COMPUTERNAME_LENGTH   +   1;    
      if(GetUserName(username,&size))    
              return   AnsiString(username);    
      return   "";    

}

// Windows 文件夹
AnsiString GetWindowsDir()
{

      String   path;    
      path.SetLength(MAX_PATH);    
      path.SetLength(GetWindowsDirectory(path.c_str(),path.Length()));    
      return   path;    

}

// System 文件夹
AnsiString GetSystemDir()
{

      String   path;    
      path.SetLength(MAX_PATH);    
      path.SetLength(GetSystemDirectory(path.c_str(),path.Length()));    
      return   path;          

}

// Temp 文件夹
AnsiString GetTempDir()
{

      String   path;    
      path.SetLength(MAX_PATH);    
      path.SetLength(GetTempPath(MAX_PATH,path.c_str()));    
      return   path;          

}
// 当前文件夹
AnsiString GetCurrDir()
{

      String   path;    
      path.SetLength(MAX_PATH);    
      path.SetLength(GetCurrentDirectory(MAX_PATH,path.c_str()));    
      return   path;    

// return ExtractFilePath(Application->ExeName);
// return ExtractFilePath(ParamStr(0));
}

void Jpg2Bmp(String JpgFile, String BmpFile) //将Jpg文件转换为Bmp文件
{

      TJPEGImage   *MyJPEG   =   new   TJPEGImage;    
      try    
      {    
              MyJPEG->LoadFromFile(JpgFile);   //图片位置    
              Graphics::TBitmap   *MyBMP   =   new   Graphics::TBitmap;    
              MyBMP->Assign(MyJPEG);    
              MyBMP->SaveToFile(BmpFile);           //保存路径    
              delete   MyBMP;    
      }    
      __finally    
      {    
              delete   MyJPEG;    
      }    

}

void Bmp2Jpg(String BmpName, String JpgName) //将bmp文件转换为jpg文件
{

      Graphics::TBitmap   *MyBMP   =   new   Graphics::TBitmap;    
      try    
      {    
              MyBMP->LoadFromFile(BmpName);   //图片位置    
              TJPEGImage   *MyJPEG   =   new   TJPEGImage;    
              MyJPEG->Assign(MyBMP);    
              MyJPEG->CompressionQuality   =   60;   //压缩比例   1..100    
              MyJPEG->Compress();    
              MyJPEG->SaveToFile(JpgName);         //保存路径    
              delete   MyJPEG;    
      }    
      __finally    
      {    
              delete   MyBMP;    
      }    

}

// 开机后自动运行程序设置
#include <Registry.hpp>
void __fastcall AutoRunFromStart(bool Set,AnsiString Title, AnsiString ExeFile)
{

      TRegistry   *Reg;    
      Reg   =   new   TRegistry();    
      Reg->RootKey   =   HKEY_LOCAL_MACHINE;    
      if(Set)    
      {    
              if(Reg->OpenKey("SOFTWARE//Microsoft//Windows//CurrentVersion//Run",false))    
                      Reg->WriteString(Title,ExeFile);    
              delete   Reg;    
      }    
      else    
      {    
              if(Reg->OpenKey("SOFTWARE//Microsoft//Windows//CurrentVersion//Run",false))    
                      Reg->WriteString(Title,";   "   +   ExeFile);    
      }    
      delete   Reg;    

}
// 根据窗口句柄获得窗口的Caption
AnsiString GetWndCaption(HWND hWnd)
{

      AnsiString   strCaption;    
      if(hWnd)    
      {    
              int   Length   =   (int)SendMessage(hWnd,WM_GETTEXTLENGTH,0,0);    
              if(Length)    
              {    
                      char   *buf   =   new   char[Length+2];    
                      buf[Length]   =   '/0';    
                      buf[Length+1]   =   '/0';    
                      SendMessage(hWnd,WM_GETTEXT,Length+1,(LPARAM)buf);    
                      strCaption   =   AnsiString(buf);    
                      delete   buf;    
              }    
      }    
      return   strCaption;    

}

// 根据窗口句柄获得窗口的类名
AnsiString GetWndClassName(HWND hWnd)
{

      char   buffer[256];    
      GetClassName(hWnd,buffer,255);    
      return   AnsiString(buffer);    

}

// 窗口位于最上
void __fastcall SetStayOnTop(bool Set,void *Handle)
{

      if(Set)    
              SetWindowPos(Handle,HWND_TOPMOST,0,0,0,0,SWP_NOMOVE|SWP_NOSIZE);    
      else    
              SetWindowPos(Handle,HWND_NOTOPMOST,0,0,0,0,SWP_NOMOVE|SWP_NOSIZE);    

}
// 是否显示在任务栏
void __fastcall ShowOnTaskbar(bool Set,void *Handle)
{

      if(Set)    
              ShowWindow(Handle,SW_SHOW);    
      else    
              ShowWindow(Handle,SW_HIDE);    

}
// 获得子网掩码
#include <Registry.hpp>
AnsiString GetSubnetMask()
{

      AnsiString   SubnetMask;    
      TRegistry   *reg   =   new   TRegistry;    
      DWORD   Version   =   GetVersion();    
      if(Version   <   0x80000000)   //WindowsNT    
      {    
              reg->RootKey   =   HKEY_LOCAL_MACHINE;    
              if(reg->OpenKeyReadOnly("SYSTEM//CurrentControlSet//Services//Tcpip//Linkage"))    
              {    
                      int   BuffLength   =   reg->GetDataSize("Bind");    
                      char   *Buff   =   new   char[BuffLength+1];    
                      reg->ReadBinaryData("Bind",Buff,BuffLength);    
                      AnsiString   Interface   =   (AnsiString)Buff;    
                      Interface   =   Interface.SubString(9,Interface.Length()-8);    
                      delete   []   Buff;    
                      reg->CloseKey();    

                      if(reg->OpenKeyReadOnly("SYSTEM//CurrentControlSet//Services//"+Interface+"//Parameters//Tcpip"))    
                      {    
                              BuffLength   =   reg->GetDataSize("SubnetMask");    
                              Buff   =   new   char[BuffLength+1];    
                              reg->ReadBinaryData("SubnetMask",Buff,BuffLength);    
                              SubnetMask   =   (AnsiString)Buff;    
                              delete   []   Buff;    
                      }    
              }    
      }    
      else   //Windows9X    
      {    
              int   i;    
              reg->RootKey   =   HKEY_LOCAL_MACHINE;    
              TStringList   *ent   =   new   TStringList;    
              if(reg->OpenKeyReadOnly("System//CurrentControlSet//Services//Class//NetTrans"))    
                      reg->GetKeyNames(ent);    
              reg->CloseKey();    
              for(i=0;i<ent->Count   ;i++)    
              {    
                      reg->CloseKey();    
                      if(reg->OpenKeyReadOnly("System//CurrentControlSet//Services//Class//NetTrans//"   +ent->Strings[i]))    
                      {    
                              AnsiString   ip   =   reg->ReadString("IPAddress");    
                              AnsiString   node   =   reg->ReadString("NodeType");    
                              if(ip   !=   "0.0.0.0"   &&   ip   !=   ""   &&   node   ==   "1")    
                              {    
                                      SubnetMask   =   reg->ReadString("IPMask");    
                                      if(SubnetMask   !=   ""   &&   SubnetMask   !=   "0.0.0.0")    
                                              break;    
                              }    
                      }    
              }    
              delete   ent;    
      }    
      delete   reg;    
      return   SubnetMask;    

}

include<winsock.h>

AnsiString GetLocalIP()
{

      //Start   up   WinSock    
      WORD   wVersionRequested   =   MAKEWORD(1,1);;    
      WSADATA   wsaData;    
      WSAStartup(wVersionRequested,   &wsaData);    

      hostent   *p;    
      char   s[128];    
      char   *p2;    
      gethostname(s,128);//获取指定计算机的名字    
      p   =   gethostbyname(s);    
      p2   =   inet_ntoa(*((in_addr   *)p->h_addr));   //获取指定计算机的IP地址    
      WSACleanup();    
      return   p2;    

}
// 打开、关闭光驱
#include "mmsystem.h"
void CDRomOpen(BOOL bOpenDrive,TCHAR cDrive)
{

      MCI_OPEN_PARMS   open;    
      MCI_STATUS_PARMS   status;    
      DWORD   flags;    
      TCHAR   szDriveName[4];    
      strcpy(szDriveName,"?:");    
      ::ZeroMemory(&open,sizeof(MCI_OPEN_PARMS));    
      open.lpstrDeviceType   =   (LPCSTR)MCI_DEVTYPE_CD_AUDIO;    
      szDriveName[0]   =   cDrive;    
      open.lpstrElementName   =   szDriveName;    
      flags   =   MCI_OPEN_TYPE   +   MCI_OPEN_TYPE_ID   +   MCI_OPEN_ELEMENT   +   MCI_OPEN_SHAREABLE;    
      if(!mciSendCommand(0,MCI_OPEN,flags,(unsigned   long)&open))    
      {    
              status.dwItem   =   MCI_STATUS_READY;    
              if(bOpenDrive)    
                      mciSendCommand(open.wDeviceID,MCI_SET,MCI_SET_DOOR_OPEN,0);    
              else    
                      mciSendCommand(open.wDeviceID,MCI_SET,MCI_SET_DOOR_CLOSED,0);    
              mciSendCommand(open.wDeviceID,MCI_CLOSE,MCI_WAIT,0);    
      }    

}
// 获得端口
#include <Registry.hpp>
void __fastcall GetPort(TStrings *List)
{

      TRegistry   *reg   =   new   TRegistry;    
      reg->RootKey   =   HKEY_LOCAL_MACHINE;    
      reg->OpenKey("HARDWARE//DEVICEMAP//SERIALCOMM",true);    
      reg->GetValueNames(List);    
      List->BeginUpdate();    
      for(int   i=0;i<List->Count;i++)    
              List->Strings[i]   =   reg->ReadString(List->Strings[i]);    
      List->EndUpdate();    
      delete   reg;    

}

// 结束一个进程
void __fastcall ProcessKill(int pPid)
{

      HANDLE   ps   =   OpenProcess(1,false,pPid);    
      if(ps   &&   TerminateProcess(ps,-9))    
      {    
              MessageBox(Handle,"中止成功!","信息",MB_OK|MB_ICONINFORMATION);    
      }    
      else    
      {    
              MessageBox(Handle,"中止失败!","信息",MB_OK|MB_ICONWARNING);    
      }    

}
String __fastcall TfrmTest::GetVersionInfo(String FileName)
{
/

  函数名:GetVersionInfo  
  用途:返回指定文件的版本信息  

/

      FileName=ExtractFilePath(Application->ExeName)+FileName;  
      if(!FileExists(FileName))  
      {  
        //将要更新的文件不存在  
        return   0;  
      }  
      //首先获得版本信息资源的长度  
        DWORD   dwHandle,InfoSize;  
        String   strVer;  
        InfoSize   =   GetFileVersionInfoSize(FileName.c_str(),&dwHandle);  
        //将版本信息资源读入缓冲区  
        char   *InfoBuf   =   new   char[InfoSize];  
        GetFileVersionInfo(FileName.c_str(),0,InfoSize,InfoBuf);  
        //获得生成文件使用的代码页及字符集信息  
        char   *pInfoVal;  
        unsigned   int   dwInfoValSize;  
        try  
        {  
          VerQueryValue(InfoBuf,"//VarFileInfo//Translation",&((void   *)pInfoVal),   &dwInfoValSize);  
          AnsiString   V   =   "//StringFileInfo//"   +IntToHex(*((unsigned   short   int   *)   pInfoVal),4)   +IntToHex(*((unsigned   short   int   *)   &pInfoVal[2]),4)+   "//FileVersion";  
          //获得具体的版本号  
          VerQueryValue(InfoBuf,   V.c_str(),&((void   *)pInfoVal),&dwInfoValSize);  
          strVer=AnsiString(pInfoVal).SetLength(dwInfoValSize-1);  
          delete   InfoBuf;  
        }  
        catch(...)  
        {  
          return   0;  
        }  
        if(strVer.Length()>10)  
        {  
          return   0;  
        }  
        String   TmpStr;  

//截取.

        for   (int   i=1;i<=strVer.Length();i++)  
        {  
            if(strVer.SubString(i,1)!=".")  
            {  
              TmpStr=TmpStr+strVer.SubString(i,1);  
            }  
            else   if((strVer.SubString(i,1)==".")&&(i==2))  
            {  
              TmpStr=TmpStr+strVer.SubString(i,1);  
            }  
        }  

//截取,

        if(strVer.Pos(",")!=0)  
          {  
            TmpStr="";  
            for   (int   i=1;i<=strVer.Length();i++)  
            {  
              if((strVer.SubString(i,1)!=",")&&(strVer.SubString(i,1)!="   "))  
              {  
                TmpStr=TmpStr+strVer.SubString(i,1);  
              }  
              else   if((strVer.SubString(i,1)==",")&&(i==2))  
              {  
                TmpStr=TmpStr+".";  
              }  
          }  
        }  

        strVer=TmpStr;  
        return   strVer;  

}

The socket components are not installed by default. To use the socket components, you must install the dclsockets<.bpl> package.

To install the socket components:

Select Component > Install Packages.
In the Install Packages dialog box, click Add.
In the Add Design Package dialog, browse to C:Program Files (x86)EmbarcaderoStudio22.0bin.
Select dclsockets.bpl, and click Open.
Click OK to dismiss Install Packages dialog.
The socket components (TClientSocket and TServerSocket) are listed in the Internet category of the Toot Palette.
Note: These steps are one-time installation instructions. The socket components should be available for all future projects.

无法安装VMware Tools
问题描述:

     Windows7虚拟机简易安装完成后,“安装VMware Tools”选项为灰色,无法点击安装。

解决方法:

   关闭虚拟机Windows7,查看虚拟机设置,将软盘“移除”掉。再次进入虚拟机Windows7,“安装VMware Tools”恢复正常。

问题2:安装过程提示驱动签名问题
问题描述:

   安装VMware Tools过程中,弹出“Windows 无法验证此驱动程序软件的发布者”。
    点击“始终安装”后,弹出错误提示“安装程序无法自动安装 Virtual Machine Communication Interface Sockets(VSock)驱动程序。必须手动安装此驱动程序”
   最终导致安装失败:

解决方法:

   由于微软更新了驱动程序签名算法,2019年开始弃用SHA1,改用SHA2。猜测VMware Tools驱动程序使用SHA2,而Windows7只支持SHA1,需要下载安装补丁kb4474419来支持SHA2算法。下载地址:Microsoft Update Catalog

https://www.catalog.update.microsoft.com/Search.aspx?q=kb4474419
建议主机搭建ftp服务器,虚拟机直接访问ftp服务器来下载。ftp工具推荐3CDaemon,只有200KB+,非常轻量。

https://blog.csdn.net/teisite/article/details/117675403

qt最后一个离线版本是
qt-opensource-windows-x86-5.14.2.exe
下载地址:
https://download.qt.io/archive/qt/5.14/5.14.2/
qt 6.4 不支持win7
只支持win10以及以后的产品。
Windows 11 21H2 (1809 or later) x86_64 MSVC 2022, MSVC 2019, MinGW 11.2
Windows 10 21H2 (1809 or later) x86_64 MSVC 2022, MSVC 2019, MinGW 11.2
也不支持x86

详细说明:
https://doc.qt.io/qt-6/supported-platforms.html

https://download.qt.io/archive/qt/5.14/5.14.2/qt-opensource-windows-x86-5.14.2.exe
https://download.qt.io/archive/qt/5.14/5.14.2/qt-opensource-mac-x64-5.14.2.dmg
https://download.qt.io/archive/qt/5.14/5.14.2/qt-opensource-linux-x64-5.14.2.run

qt5支持win7
Windows 11 21H2 x86 and x86_64
Windows 10 21H2 x86 and x86_64 MSVC 2022, MSVC 2019, MSVC 2017, MSVC 2015, MinGW 8.1
Windows 8.1 x86 and x86_64 MSVC 2019, MSVC 2017, MinGW 8.1
Windows 7 x86 and x86_64 MSVC 2019, MSVC 2017, MinGW 8.1

https://doc.qt.io/qt-5/supported-platforms.html

ubuntu qt 6.4 remove

Updating or Removing Components
Once Qt is installed, you can use the Maintenance Tool under <install_dir> to add components, update, or remove installed components.

From The Terminal:

  1. Remove the package:

    sudo apt-get remove qtcreator && sudo apt-get remove qt5*

  2. Remove all the dependencies:

    sudo apt-get purge qtcreator && sudo apt-get purge qt5*

  3. Remove the unneeded packages that were once installed as a dependency:

    sudo apt-get autoremove

  4. Remove the retrieved packages from the local cache:

    sudo apt-get autoclean

From the GUI:

Open Qt Maintenance Tool Qt Maintenance Tool
Tick Uninstall Uninstall
Click next, then Uninstall enter image description here
Enter the Sudo password if requested then, press Finish.

Qt5.14.2安装在Win7上面要11G多。

要支持xp,估计要用Qt5.6
我现在还经常在用 Qt 5.6,因为这个版本支持 winxp.
https://download.qt.io/new_archive/qt/5.6/5.6.3/
Qt5可以使用msvc编译器和mingw编译器,而msvc的编译器从2015开始就对xp的支持变差,就算通过各种编译配置命令设置,能xp下运行,但是会很可能发生一些奇奇怪怪的bug。而mingw编译器没有这个问题,同一个版本可以在xp win7 win10各个系统使用,而无需其他配置。另外,Qt5目前有两个长期支持版本(Long Term Support)Qt5.6和Qt5.9,Qt5.6可以在XP和win7及以上系统开发,而Qt5.9只支持win7以上的系统开发和部署。 所以如果想使用Qt5的新功能,又想开发出的软件能在xp系统上运行,可以选择Qt5.6的mingw-32bit版本或者vs2013版本进行开发。
1、Qt从5.7版本开始不再支持WinXP系统,即编译生成的exe文件无法在WinXP系统运行。
2、Qt5.6是长期支持版本Long Term Support,它可以支持WinXP-32bit的系统。参考:http://doc.qt.io/qt-5.6/supported-platforms.html
下载网站是:
http://download.qt.io/new_archive/qt/5.6/5.6.3/
请注意,这几个版本是完全ok的:
qt-opensource-windows-x86-msvc2013_64-5.6.3.exe
qt-opensource-windows-x86-msvc2013-5.6.3.exe
qt-opensource-windows-x86-mingw492-5.6.3.exe

https://download.qt.io/new_archive/qt/5.6/5.6.3/qt-opensource-windows-x86-msvc2013-5.6.3.exe
https://download.qt.io/new_archive/qt/5.6/5.6.3/qt-opensource-windows-x86-mingw492-5.6.3.exe
https://download.qt.io/new_archive/qt/5.6/5.6.3/qt-opensource-linux-x64-5.6.3.run

qt分发程序的问题
在将 Qt 程序构建、运行、打包之后点击生成的 exe 文件发现出现以下“ZN10QArrayData10deallocateEPS_jj无法找到入口”错误。

无法定位程序输入点_ZN10QArrayData10deallocateEPs_jj于动态链接库..... .exe上。
之后发现是因为构建项目时使用的编译工具和打包软件时使用的编译工具不一样所导致的。

打开关于release相关的文件夹,找到该目录下release目录下的.exe程序。将这个.exe文件拷贝出来,创建一个单独的文件夹,放在这个文件夹下。
从Windows图标找到Qt软件,找到相同的编译工具,打开。
在该命令行窗口中通过盘符和cd命令转到才拷贝出来的exe程序所在的目录。
使用windeployqt命令打包,即windeployqt 文件名.exe 敲击回车。这一步操作是将所需的库文件全都拷贝到exe程序的当前文件
此时程序目录如下,点击exe文件即可正常运行程序。将该目录整体拷贝到其它Windows系统中也可直接运行。
from: https://www.twblogs.net/a/5ef7ff959d5eac1aaa69bcb6/?lang=zh-cn

Qt 错误
create directory “C:UsersAdministratorDocumentsError in " Util.asciify
项目->shadow build 去掉打钩,run正常.
或者打勾,手动建立一个临时目录供编译生成。

qt ui修改不生效

办法一:
在.pro文件中加入:

UI_DIR=./

这条命令直接将ui目录指定为项目目录。

办法二:
取消影子编译,这样所有编译在项目文件夹下进行,但不同kit的程序会覆盖(其实没什么问题)

qt 修改title
setWindowTitle(ui->label->text());

qt groupbox border

解决方案:

1. 在QGroupBox控件右键;
2. 选择 Change styleSheet... 选项卡;
3. 在文本框里输入(可以通过对话框上面的Add Resource、Add Gradient、Add
    Color、Add Font快速添加属性):
    QGroupBox {
        border-color: rgb(156, 156, 156);
        border-width: 1px;
        border-style: solid;
        margin-top: 0.5ex;
    }
    QGroupBox::title {
        subcontrol-origin: margin;
        subcontrol-position: top left;
        left: 10px;
        margin-left: 2px;
        padding: 0  0px;
    }
4. 点击OK按钮;
5. 确认效果。

Qt textedit写日志效果

void Dialog::on_pushButton_clicked()
{
    //ui->label->adjustSize();
    ui->pushButton->setText("Hello World!");

    ui->textEdit->document()->setMaximumBlockCount(30);
    ui->textEdit->append("123 然后每次再追加数据,就没问题了");

}

获取ms时间字符串

#include <chrono>
#include <iomanip>
#include <iostream>

string getTimestamp() {
  // get a precise timestamp as a string
  const auto now = std::chrono::system_clock::now();
  const auto nowAsTimeT = std::chrono::system_clock::to_time_t(now);
  const auto nowMs = std::chrono::duration_cast<std::chrono::milliseconds>(
      now.time_since_epoch()) % 1000;
  std::stringstream nowSs;
  nowSs
      << std::put_time(std::localtime(&nowAsTimeT), "%a %b %d %Y %T")
      << '.' << std::setfill('0') << std::setw(3) << nowMs.count();
  return nowSs.str();
}

Qt静态编译
ActivePerl-5.22.1.2201-MSWin32-x64-299574.msi
下载地址:
https://github.com/judwhite/talks-goperf/tree/master/tools

安装(以mingw为例,下载路径为
https://download.qt.io/new_archive/qt/5.6/5.6.3/qt-opensource-windows-x86-mingw492-5.6.3.exe
qt-opensource-windows-x86-mingw492-5.6.3.exe,因为mingw免费

意安装路径不要有中文

3.修改mingw的连接器配置项为静态编译

也就是修改5.6.3\Src\qtbase\mkspecs\win32-g++\qmake.conf

将QMAKE_LFLAGS=后添加-static作为编译参数

将QMAKE_LFLAGS_DLL=-shared改为-static作为编译参数

安装编译需要的工具

根据qt官方编译windows库需要条件(https://doc.qt.io/qt-5/windows-requirements.html),需要安装Python与ActivePerl,安装完毕后,如果环境变量没有,请手动将这两个软件添加到环境变量中去。

同时请将安装目录下的Tools\mingw492_32\bin添加到环境变量中去。

运行configure

小沃运行的是如下完整命令configure.bat -c++std c++11 -platform win32-g++ -prefix C:\Qt\Qt5.6.3\5.6.3\staticlib -release -opensource -confirm-license -static -qt-zlib -qt-libpng -qt-libjpeg -qt-pcre -qt-freetype -no-qml-debug -no-openssl -no-opengl -nomake examples -nomake tests

(1)需要根据自己Qt的实际安装路径修改G:\Qt\Qt5.6.3\5.6.3\staticlib

(2)这个命令只添加了最基础的Qt支持,以下是可选修改

-opengl desktop 替换-no-opengl让其支持opengl库

-qt-zlib        压缩库,提高兼容性,可以去掉

-qt-pcre        正则表达式,提高兼容性,可以去掉

-qt-libpng      png格式图片,提高兼容性,可以去掉

-qt-libjpeg     jpeg格式图片,提高兼容性,可以去掉

-fontconfig     需要用到字体美化库时添加

7.编译

mingw32-make -j8

8为cpu核心数,这个数字最好是与cpu核心数一致,可充分利用多核特性。

8.安装

mingw32-make install

9.使用

以后使用需要将G:\Qt\Qt5.6.3\5.6.3\staticlib\bin添加到环境变量中去,然后通过qtcreate开发完毕程序后,整个程序的工程通过命令行运行如下命令即可。

qmake

mingw32-make

最后就会在工程文件下的release下看见编译出的东西了。

https://www.worldflying.cn/article-id-366.html

For example, on Ubuntu Linux systems, Qt can be compiled by several compilers such as clang or g++:

./configure -platform linux-clang
./configure -platform linux-g++
./configure -platform linux-g++-32
For Windows machines, either MinGW or Visual Studio toolchains can be used to compile Qt.

configure.bat -platform win32-g++
configure.bat -platform win32-msvc

https://doc.qt.io/qt-5/configure-options.html

Qt获取textedit内容
不同于其它控件的text()函数,QText Edit获取文本的函数为toPlainText()。

QString strTxtEdt = ui->textEdit->toPlainText();

函数原型:

QString QTextEdit::toPlainText() const;

Returns the text of the text edit as plain text.
Note: Getter function for property plainText.

Qt串口操作
头文件

#include <QtSerialPort/QSerialPort>
#include <QtSerialPort/QSerialPortInfo>
#include <QIODevice>
#include <QDateTime>
#include <QTimer>
#include <QByteArray>

QSerialPort *serialPort;
QByteArray RxData;

源文件

serialPort = new QSerialPort(this);
connect(serialPort, &QSerialPort::readyRead, this, &Dialog::ReadData);

foreach(const QSerialPortInfo &info, QSerialPortInfo::availablePorts())
{
    qDebug()<<"port name"<<info.portName();
    qDebug()<<"Description"<<info.description();
    qDebug()<<"Manufacturer"<<info.manufacturer();
    ui->cbb_port->addItem(info.portName());
}    

serialPort->setPortName(ui->cbb_port->currentText());
if(serialPort->open(QIODevice::ReadWrite))
{
  add_memo_info("串口打开成功");
  ui->btn_serial->setText("关闭串口");
}
serialPort->setBaudRate(ui->cbb_bade->currentText().toInt());
serialPort->setParity(QSerialPort::NoParity);
serialPort->setDataBits(QSerialPort::Data8);
serialPort->setStopBits(QSerialPort::OneStop);
serialPort->setFlowControl(QSerialPort::NoFlowControl);

void Dialog::ReadData()
{
    RxData = serialPort->readAll();
    if(RxData.isEmpty())
    {
        add_memo_info("没有收到相应数据");
    }

    QString str =  RxData.toHex().toStdString().c_str();
    add_memo_info("recv<- " +  str);
}

bool Dialog::SendData(std::string strhex)
{
    QByteArray ba;
    string strorig = strhex;
    strhex = hex_to_string(strhex);
    ba = QByteArray::fromStdString(strhex);
    int ret = serialPort->write(ba);
    if(ret>0)
    {
        return true;
    }
    else
    {
        return false;
    }
}

QT使用资源管理器打开目录

QString str = QCoreApplication::applicationDirPath();
QDesktopServices::openUrl(QUrl(str, QUrl::TolerantMode));

也可以使用

QDesktopServices::openUrl(QUrl::fromLocalFile(qApp->applicationDirPath()));

qt folder exists
To check if a directory named "Folder" exists use:

QDir("Folder").exists();

To create a new folder named "MyFolder" use:

QDir().mkdir("MyFolder");

Qt支持openssl

wget https://www.openssl.org/source/old/1.0.2/openssl-1.0.2u.tar.gz
tar xvf openssl-1.0.2u.tar.gz
cd openssl-1.0.2
./config enable-shared
make -j4
cp libssl.so* libcrypto.so* ~/Qt5.6.3/5.6.3/gcc_64/lib/ -a

代码中检测SSL

 qDebug()<<QSslSocket::supportsSsl();
 qDebug()<<QSslSocket::sslLibraryVersionString();

true
"OpenSSL 1.0.2u 20 Dec 2019"

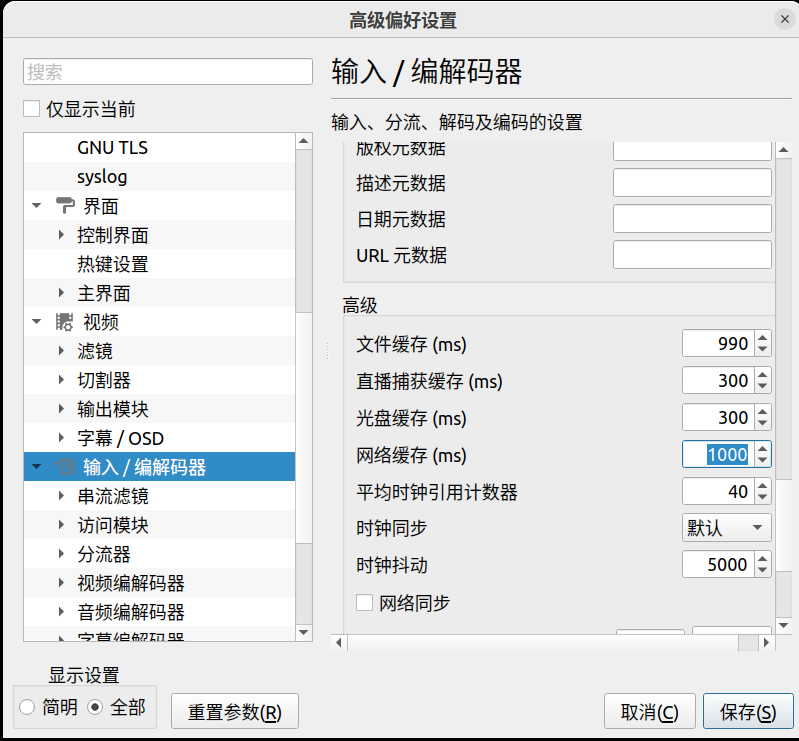
Windows平台 VLC播放RTSP视频延迟问题

找到工具->首选项,然后参数设置左下角选择“全部”,左边选择 “输入/编解码”->“网络缓存”选项,可以根据具体需要加以修改,300ms以内效果很好,实时性较好。
vlc 的默认缓存是1000ms,所以大家会觉得有1秒多的延迟,这是正常的。

截图 2023-01-09 08-38-07.png
linux平台上的vlc可以以命令行的方式来运行,而命令行是可以带参数的,我们只需要在参数里面指定这个延迟时间就可以了,

vlc rtsp://192.168.1.1:8556/test.avi  --newwork-caching=300

https://developer.aliyun.com/article/243646