tshark 大杂烩 合集
列出当前存在的网络接口
tshark -D
- ciscodump (Cisco remote capture)
- dpauxmon (DisplayPort AUX channel monitor capture)
- randpkt (Random packet generator)
- sdjournal (systemd Journal Export)
- sshdump (SSH remote capture)
- udpdump (UDP Listener remote capture)
sudo tshark -D
Running as user "root" and group "root". This could be dangerous.
- eth0
- any
- lo (Loopback)
- docker0
- nflog
- nfqueue
- usbmon1
- ciscodump (Cisco remote capture)
- dpauxmon (DisplayPort AUX channel monitor capture)
- randpkt (Random packet generator)
- sdjournal (systemd Journal Export)
- sshdump (SSH remote capture)
- udpdump (UDP Listener remote capture)
tshark对指定网卡监听,抓包
sudo tshark -i <interface>
抓取网卡eth0的流量并写入capture123.pcap
tshark -i eth0 -w capture123.pcap
读取之前的文件capture123.pcap
tshark -i eth0 -r capture123.pcap
抓取网卡eth0的流量10分钟
tshark -i eth0 -a duration:600
注: 默认时间单位为秒
抓取网卡eth0的10000个数据包
tshark -c 10000 -i eth0
抓取网卡eth0涉及192.168.1.1的流量报文
tshark -i eth0 -f "host 192.168.1.1"
注: 与wireshark、tcpdump一致,均使用BPF过滤表达式
抓取网卡eth0指定协议的流量报文
tshark -i eth0 -f "<协议名>"
协议名可以为: tcp, udp, dns, icmp, http等
实时打印当前mysql查询语句
tshark -s 512 -i eth1 -n -f 'tcp dst port 3306' -R 'mysql.query' -T fields -e mysql.query
说明:
-s 512 :只抓取前512个字节数据
-i eth0 :监听eth0网卡
-n :禁止域名解析
-f ‘tcp dst port 3306’ :只捕捉协议为tcp,目的端口为3306的数据包
-R ‘mysql.query’ :过滤出mysql.query查询语句的报文
-T fields -e mysql.query :打印mysql查询语句
实时打印当前http请求的url(包括域名)
tshark -s 512 -i eth1 -n -f 'tcp dst port 8000' -R 'http.host and http.request.uri' -T fields -e http.host -e http.request.uri -l | tr -d 't'
说明:
-s 512 :只抓取前512个字节数据
-i eth1 :监听eth1网卡
-n :禁止网络对象名称解析
-f ‘tcp dst port 8000’ :只捕捉协议为tcp,目的端口为8000的数据包
-R ‘http.host and http.request.uri’ :过滤出http.host和http.request.uri
-T fields -e http.host -e http.request.uri :打印http.host和http.request.uri
-l :输出到标准输出
读取之前抓包文件进行报文数据分析
需要从抓包的文件evidence04.pcap中提取出报文相关数据信息,如时间、源IP、目的IP、协议名、源Port、標Port、包大小等信息,最后输出到csv文件。
tshark -r evidence.pcap -T fields -e frame.time_relative -e ip.src -e ip.dst -e ip.proto -e tcp.srcport -e tcp.dstport -e frame.len -E header=n -E separator=, -E quote=n -E occurrence=f > output.csv
说明:
-r evidence.pcap 需要分析的报文记录文件(pcap格式)
-T fields 输出格式,选fields按字段,也可以选json等其他格式,需结合-e 及 -E使用
-e frame.time_relative 取出封包的相对时间
-e ip.src 提取源IP
-e ip.dst 提取目的IP
-e ip.proto 提取协议名
-e tcp.srcport 提取源Port
-e tcp.dstport 提取目的Port
-e frame.len 提取数据帧大小
-E header=n 是否输出字段名称(cvs的第1行)
-E separator=, 指定分割符,/t是tab,/s是一格空格
-E quote=n 指定是否对字段用引号,d是双引号,s是单引号,n是不用
-E occurrence=f 多值时是否保留,f是第一个值,l是最后一个值,a是所有值都列出,默认全部
output.csv 输出文件路径及名称
DNS报文过滤
使用tshark过滤dns cap包中源ip、目的ip、request请求
tshark -r test.cap -T fields -e frame.time -e ip.src -e ip.dst -e dns.qry.name -R 'udp.dstport==53 || dns'
说明:
-r test.pcap 需要分析的报文记录文件(pcap格式)
-T fields 输出格式,选fields按字段,也可以选json等其他格式,需结合-e 及 -E使用
-e frame.time 提取数据帧时间
-e ip.src 提取源IP
-e ip.dst 提取目的IP
-e dns.qry.name 提取dns查询的域名信息
-R 'udp.dstport==53 || dns' 显示过滤,仅对udp目标端口为53或者dns协议的报文进行处理
默认直接显示在终端上,不记录文件。
tshark: Couldn't run /usr/bin/dumpcap in child process: Permission denied
解决办法:
On Debian and Debian derivatives such as Ubuntu, if you have installed Wireshark from a package, 1.try running
sudo dpkg-reconfigure wireshark-common
selecting "<Yes>" in response to the question
2.adding yourself to the "wireshark" group by running
sudo usermod -a -G wireshark {your username}
- then logging out and logging back in again.
tshark 示例
tshark -T ek -e data.data -i eth0 "udp port 12345"
Capturing on 'eth0'
{"index" : {"_index": "packets-2022-03-03", "_type": "pcap_file"}}
{"timestamp" : "1646291304083", "layers" : {"data_data": ["ff:ff:00:b0:e1:3e:c9:42:6f:32:01:19:21:23:07:10:27:12:49:bd:ad:cb:d5:32:01:00:01:00:40:32:01:62:19:61:61:29:82:20:19:10:21:20:29:10:21:cb:d5:42:31:53:30:36:30:00:00:00:00:00:00:01:00:00:2e:11:0f:04:02:00:1c:00:00:05:d0:a1:d0:cd:c6:fb:b3:b5:00:00:00:00:00:00:00:00:32:34:31:35:31:34:54:00:00:00:00:00:00:00:00:00:ff:ff:ff:ff:ff:ff:ff:ff:ff:ff:ff:ff:ff:ff:ff:ff:ff:ff:ff:ff:bd:ad:cb:d5:32:01:00:01:17:40:32:01:19:21:23:07:10:27:12:49:20:19:10:21:20:29:10:21:cb:d5:42:31:53:30:36:30:00:00:00:00:00:00:01:ff:ff:ff:ff:ff:ff:ff:20:01:00:00:00:00:85:59"]}}
{"index" : {"_index": "packets-2022-03-03", "_type": "pcap_file"}}
{"timestamp" : "1646291304084", "layers" : {"data_data": ["ff:ff:00:10:f1:00:3e:c9:42:6f:32:01:19:21:23:07:10:27:12:49:61:b9"]}}
tshark 高端用法
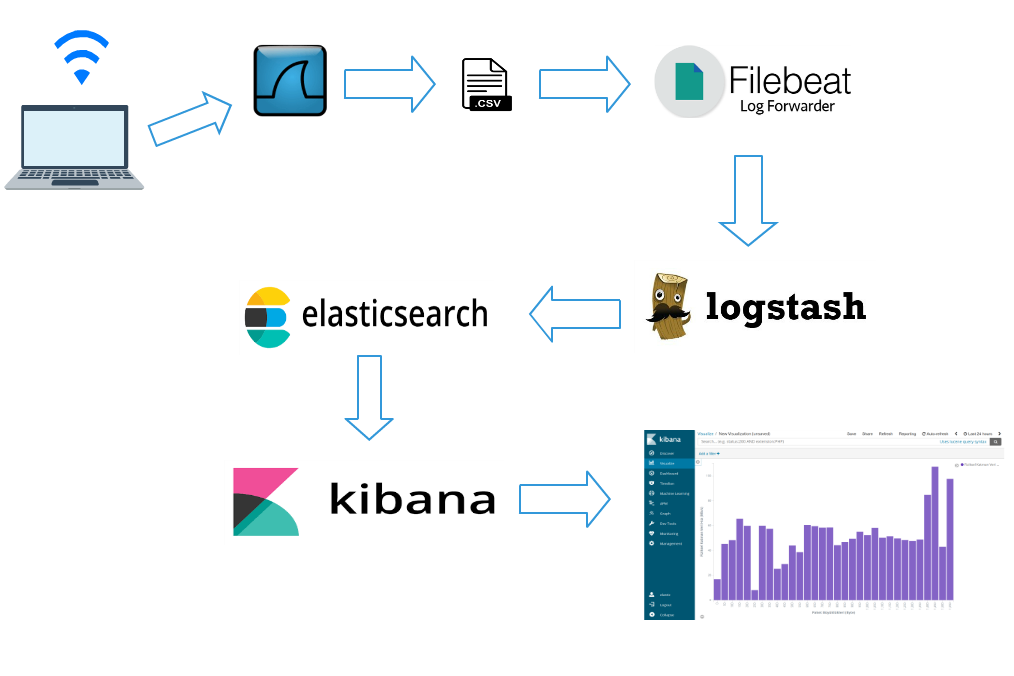
tshark结合elasticsearch分析WIFI网络流量
https://harrunisk.github.io/2018-09-12-ElasticWifiAnalysisEn/
- Tshark captures wireless packets by using filters.
tshark -a duration:600 -i phy0.mon -t ad -t ad -lT fields -E separator=, -E quote=d -e _ws.col.Time -e wlan.fc.type -e wlan.fc.type_subtype -e radiotap.dbm_antsignal -e frame.len -e radiotap.datarate > tshark.csv
- Tshark writes captured wireless packets as .csv.
- Filebeat listens .csv file sends to Logstash.
- Logstash filters data again and sends to Elasticsearch.
- Analyze data by using Kibana. Dashboard, graph etc.

tshark 输出csv格式数据
命令
tshark -a duration:6 -t ad -t ad -Tfields -E separator=, -E quote=d -e ip.src -e ip.dst -e data.len -i eth0 "udp port 12345"结果
"61.54.103.229","172.18.73.109","182"
"172.18.73.109","61.54.103.229","22"
"61.153.149.53","172.18.73.109","182"
"172.18.73.109","61.153.149.53","22"
"223.112.138.246","172.18.73.109","182"
"172.18.73.109","223.112.138.246","22"
tshark支持将pcap报文分析后生成json文件导入elasticsearch,同时支持elasticsearch的批量导入接口_bulk的格式,命令如下:
tshark -r test_trace.pcap -T ek > test_trace.pcap.json
之后可以将json文件通过curl导入。
curl -s -H "Content-Type: application/x-ndjson" -XPOST "localhost:9200/foo/_bulk" --data-binary "@/Users/test-elastic/test_trace.pcap.json"
网络流量回溯分析(https://paper.seebug.org/427/)
ubuntu20 安装最新版的wireshark/tshark
默认的tshark 版本还是2.6.10
tshark -v
TShark (Wireshark) 2.6.10 (Git v2.6.10 packaged as 2.6.10-1~ubuntu18.04.0)
tshark -v
TShark (Wireshark) 3.2.3 (Git v3.2.3 packaged as 3.2.3-1)
安装最新的
可选
sudo apt-get install software-properties-common
sudo add-apt-repository ppa:wireshark-dev/stable
sudo apt update
sudo apt -y install wireshark tshark
tshark -v
TShark (Wireshark) 3.4.8 (Git v3.4.8 packaged as 3.4.8-1~ubuntu20.04.0+wiresharkdevstable1)
wireshark/tshark相关权限配置
sudo usermod -a -G wireshark $USER
sudo chgrp wireshark /usr/bin/dumpcap
sudo chmod 750 /usr/bin/dumpcap
sudo setcap cap_net_raw,cap_net_admin=eip /usr/bin/dumpcap
Then verify it by submitting command line :
sudo getcap /usr/bin/dumpcap/usr/bin/dumpcap = cap_net_admin,cap_net_raw+eip
tshark -G elastic-mapping
Starting with Wireshark 3.0.0rc1, TShark can now generate an Elasticsearch mapping file by using the -G elastic-mapping option.
Analyzing Network Packets with Wireshark, Elasticsearch, and Kibana
https://www.elastic.co/cn/blog/analyzing-network-packets-with-wireshark-elasticsearch-and-kibana